Valorants new sentinel

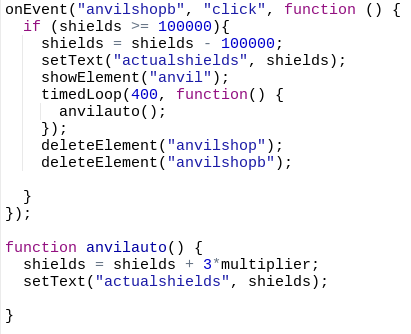
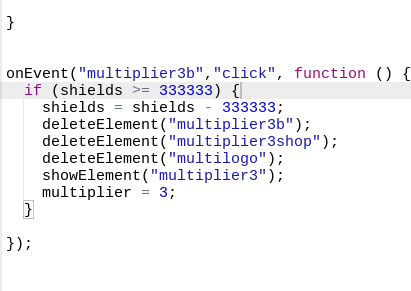
Hello and welcome back to another blog post. today’s blog was supposed to be part 9 of our shield clicker project however I am not feeling well. Thankfully it isnt covid but it is a nasty ear infection. I should however be able to have that post up tomorrow so stay tuned.

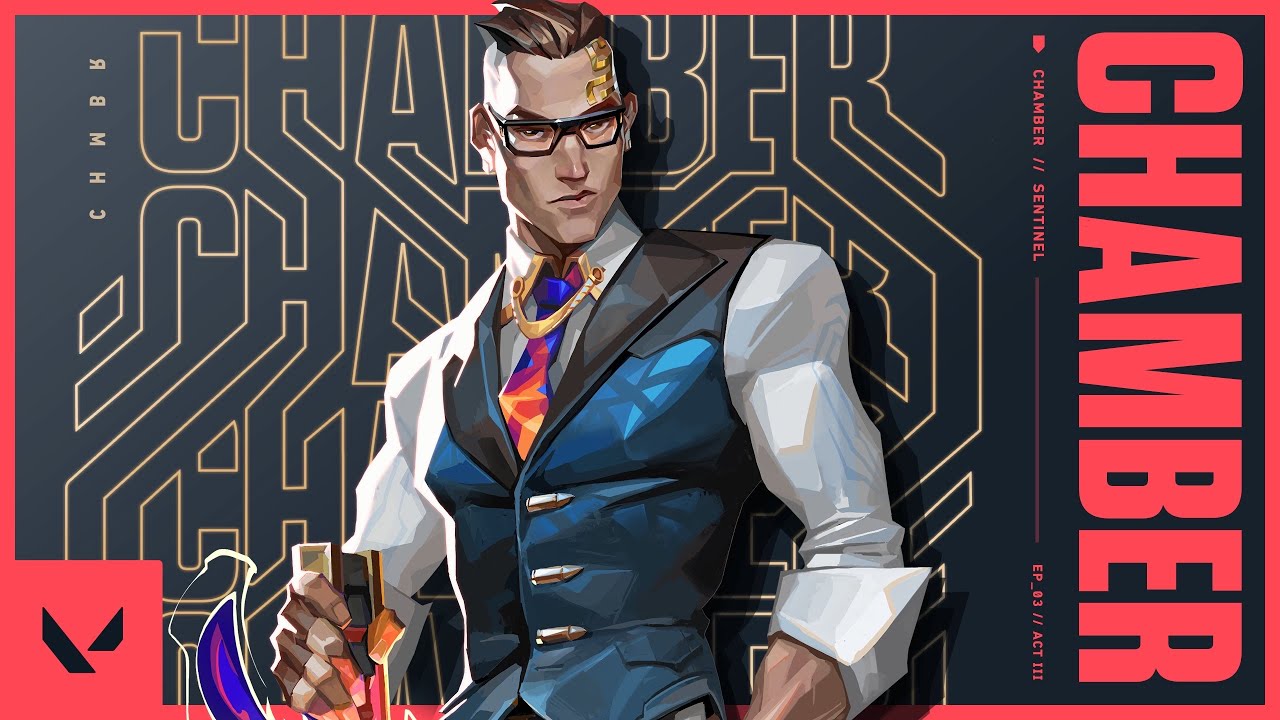
This new agents name is chamber and he hails from France. He has 4 abilities just like every other agent. So lets dive right into them.

L'Accord - Chamber Agent Trailer // VALORANT - YouTube

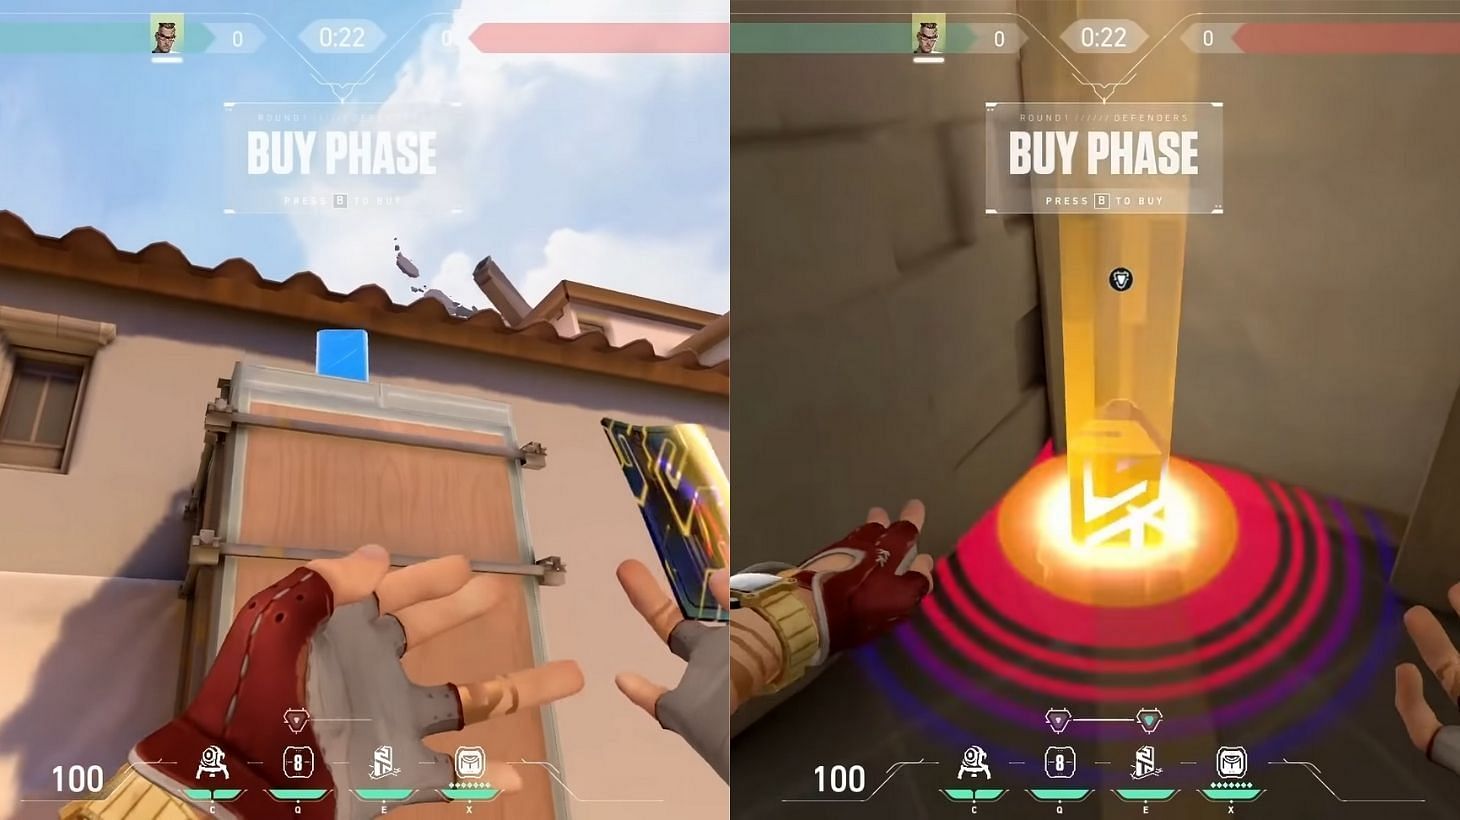
His first ability is called “Trademark” and it is a small robot that scans for enemies and then explodes into a large radius slow it also alerts chamber. Which is a quite useful ability similar to cyphers tripwires.

Valorant's New Agent is Called Chamber; Here Are All the Abilities and  Ultimate | Beebom

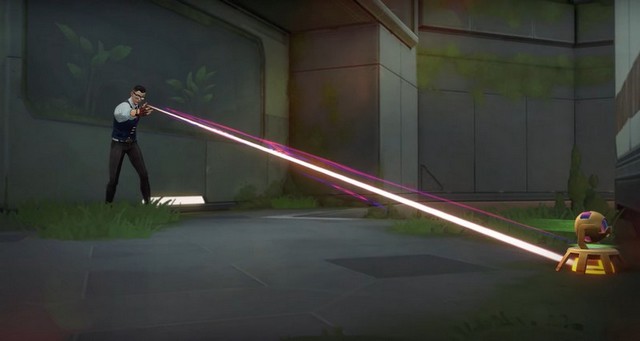
His next ability is called “Headhunter” it is a pistol that he can summon when the player presses q. This makes chamber the only agent that can use 3 guns in one round. This pistol is very similar to the sheriff and costs credits for each bullet.

Chamber New Visual Bug With Headhunter!!! (FIXED) - YouTube

Chambers 3rd ability is called “Rendezvous” This allows chamber to put down and pickup 2 teleport points that he can move between when inside a certain radius around them by clicking E.

Valorant Chamber Guide: How to play with the agent on Ascent

Chambers final ability is his ultimate called “Tour de Force”. It allows him to summon a sniper rifle with a limited ammo supply that is similar to the operator. Making him not only the only agent that can use 3 weapons but also the only agent that can use 4 weapons.

VALORANT new agent Chamber: A charming defense monster

I hope you guys enjoyed this blog post sorry it was kind of short I am just really not feeling well I hope everyone has a good rest of the week and stay safe.

Shield Clicker Project Part 8

Hello and welcome back to another blog post and of course another part of our project. We are getting quite close to the end of this awesome project. But first we need to finish our prestige shop and maybe work on rebirths. But we are pretty much done with the main part of our app.

To get started no one on the last post was able to guess what the ability was so I guess I’ll have to tell you guys now. This ability is called Chrono warp with the 50 ptoken offering you are able to recruit Chronos to hop forward in time to help you gather shields. Now lets start with the code.

We first need to create and hie these 3 elements. The first one tells the user when a chrono warp activates. The second is an image in the shop and the last one is the actual shop button.

These are chrono warp image and button respectively

This is “chronoinfo”

Now with these in place we can actually start writing code for them.

We will start with the Chrono warp button, This button will use the following code which I will break down.

This code will start by checking if the user presses the button firstly. Next it checks if the user has 50 ptokens or more. It then subtracts them from the total and updates the text.

After which it deletes it’s own shop image and button to make room for the new and final addition to our prestige shop which is the pantheon. Just like with chronowarp this is a hint for the next item that will be coming into the shop. If someone can guess what this ability will do in the comments below then they will get to add one feature to the app (that is appropriate) and will be featured in my next blog so leave a comment with your ideas below.

Back to the code

This is the code for our actual chronowarp function it works kind of similarly to Hephaestus’s Rage, however it adds shields directly as opposed to adding a multiplier.

To start it calls the function ever 25 seconds because of our timed loop so that the ability isn’t constantly activating . It then adds a random amount of shields to our shield count. Any number from 100,000 to 1,000,000 shields. Following this it updates our actual shield count, Shows chrono info, and then waits 3.5 seconds to hide chrono info so people can read it.

I hope you all enjoyed this blog post see you next time and make sure to leave a comment with your ideas down below.

Valorant’s new agent Neon

I’ve recently wanted to make this blog more broad and not just include content about coding but about things I do in my life that aren’t related to school or extracurricular’s as much. So in this blog post I’m going to be talking about Valorant’s newest agent Neon.

Neon is a duelist with a very unique kit that is quite diverse.

Breaking down Neon, VALORANT's new Filipino agent

This is what she looks like and now we will get into her abilities.

Her first ability is called High Gear. It is activated when the player presses e and it allows her to move faster for a certain amount of time based on how much energy she has charged. Once she hits a high enough velocity she can slide with a click of the right mouse button. This slide is quite similar to a Jett dash however it is on the ground and cannot be used in the air.

Neons next ability is called relay bolt which sends out a stun that splits into 2 as soon as it hits a surface. This is a great ability for clearing corners or whole sites. As she can have up to 2 of these stuns which split into 4.

All Neon's Abilities Explained | EarlyGame

Her 3rd regular ability is called fast lane that creates 2 walls to the sides of neon and extend a pretty far distance. These wall block enemy vision and can damage teammates and enemies alike so it is important to communicate when using this ability in particular.

All Neon's Abilities Explained | EarlyGame

Neons final ability is her ultimate called overdrive. This allows neon to go fast just like with her e ability and it allows her to shoot electricity out of her hands. She can fully recharge the duration of her ultimate with each kill. This makes her an invaluable asset when she uses this ability as it can devastate any enemies she comes into contact with.

Here are all the abilities for Neon, VALORANT's electric new agent - Dot  Esports

Thank you all for reading I hope you enjoyed this different type of blog post and make sure to check back tomorrow for more coding content.

Shield Clicker Project Part 7

It’s that time again time to add more to our project! One thing before we start however it is currently finals week for me so I might not post as frequently as I’m pretty busy but so far its been okay. Those of you who read my last post got a small sneak peek into what we will be doing next lesson. You are still likely wondering what it is and what it does which we will be finding out today.

This new item in our prestige shop will essentially give us another multiplier which obviously will be quite good as it is a very expensive upgrade but I think its quite worth it.

This code is essential to make our exchange button work and convert our shields to ptokens. It first checks if the user has enough shields of course, next it subtracts them from the total and updates the text. Which is all standard from all of our other purchase options. It then adds to our new variable ptokens and then sets the text for the ptokens text output. Finally it hides the info box from last lesson as it is now irrelevant and takes up a lot of space.

Now we can add the code for buying our rage and then finally using it.

Of course to start as always we have an if statement to ensure no one tries to buy the rage ability without having enough ptokens. It then subtract them from the total and sets the text once again. I did this text differently than the shields text, but I don’t want to redo the shields text as I’ve now coded over 250 lines and don’t think it makes sense to change.
It’s also a good demonstration of how in coding there are a lot of ways to solve the same problem. Continuing on with our code we then delete the rage button and its image. And shows the image and button of our next ability. But that’s the only sneak peek this lesson. Finally it activates our enrage(d) function.

If anyone guesses what the ability does in the comments they get to decide what the next ability is. So make sure to leave a comment if you have any ideas.

Now this code is definitely the most complicated part of this project and took me close to 45 minutes to figure out as I haven’t learned this in AP computer science yet. This code makes it so that the rage can only activate every so often and then the multiplier resets back to 1. This required me to make another variable.

new variable

after the timeout it starts a timed loop that activates roughly every 4-5 seconds which shows the ragemeter text box which has the words “Hephaestus’s RAGE Activated”. After which it sets the new variable ragemultiplier to 10. It then waits and then sets the multiplier back to 1.

Thats going to be it for this post, thank you all for reading. Let me know in the comment your guess to the new ability and any ideas you might have.

Shield Clicker Project Part 6

Welcome back to another blog post today we will be adding another new mechanic to our game The Prestige shop. In this shop once players reach 1 million shields they will be able to trade in 100,000 shields for 1 ptoken that can be used to purchase special upgrades and abilities.

We will need to add 3 main new elements and 1 new screen

These are the names of the 3 new elements

And this will be the name of our new screen.

To start we need to code our Prestige shop button to only appear when we have reached 1 million shields

The above code will first check if we have greater than or equal to 1 milion shields. If that is the case it will hide my original title and show the Prestige shop button like this.

Then with the code below it we will be able to go the prestige shop show our exchange element and show ptokens text which allows the user to see how many ptokens they have.

There is also an information bubble in the prestige shop that explains how the exchange button works. As well as a home button that brings the user back to the main shield clicker page.

And I started the UI development for the Prestige shop however I have not added much yet only the first ptoken item which is like a sneak peek for the next lesson

You guys will get to see what this does next part of the project

Thank you all for reading and be sure to come back for the next part of this project.

Shield Clicker Project Part 5

Sorry its been a while but we are back with another coding post and we are finishing our new 3 shop items. In the previous lesson we fully finished the code for our 2nd shield but we need a new multiplier and a new autoclicker. For my new autoclicker I will be using an anvil and for the multiplier I will just be using a multiplier logo.

Now for the more important part the code. We will start with the anvil code and its shop code as well.

So as soon as a player clicks on the shop button of the anvil it checks to see if they have at least 100,000 shields if they do it takes the 100,000 and then resets the text it then shows the anvil and begins the anvil auto commands. It then promptly deletes its shop elements. The anvil auto command is very similar to our original autoclicker function that simply adds 3 shields per set amount of time, times any multipliers that we have.

Now we need to add our code for our new multiplier

This code once again checks to see if the player has 333,333 shields and if so it proceeds it then subtracts 333,333 shields from the players total and updates the text and deletes its shop elements. As well as the old multiplier logo, and it then shows the new multiplier. Finally it sets my multiplier value to 3.

Thats going to be it for this blog I hope you enjoyed and make sure to check back soon for a new post.

A little bit of a different post

Hello everyone and sorry I was gone for so long but I wanted to make an update of not only where I was but also where the world is right now. Its a strange place out there with COVID and the world is different now. Things likely wont go back to the way they were for the foreseeable future. The best thing we can do is carry on. On that note lets get into it.

Some important things that have happened in the world recently include the approval of the Covid-19 booster shot from Pfizer for ages 12+ and I got mine last week Thursday. I’m sure you all know where this going. So I got the shot and went to school Friday and felt fine. But when I got home I passed out at around 3:30 pm and woke up around 10 am the next day. And I had no reaction to the first 2 doses so just a word of advice is to make sure to take it on a Friday or just take some time of work/school.

Another thing thats going on in the world right now is there was a new way to fight cancer developed that is the most revolutionary thing that has been developed in decades. Which is CAR-T cell therapy. Essentially in this form of therapy a patients own blood/cells are extracted and then their T cells are modified to recognize, attach to, and destroy cancerous cells that their non altered cells don’t recognize.

Ethical and Biosafety Oversight of New CAR T-Cell Products

This is a basic diagram explaining what I said probably a little more simply. But this therapy will help millions of people and will definitely help in the battle against stopping cancer.

And of course we can’t forget the situation with Covid between omicron and the delta variants. Which is why it is still essential to get vaccinated if you haven’t already. And if you can get your booster as well.

That’s going to be it for this blog but make sure to stay safe and see you next time.

Shield Clicker Project Part 4

In today’s project we will once again be working on the shop and adding new items to it. As there isn’t much more to add to the actual clicker screen. So we will be adding a new shield a new auto clicker and a new special upgrade which we might have to wait to add. But lets get started.

First things first I have to design a new shield.

This is the design I chose for the shield now from here the code.

This is quite similar to the previous shield purchasing code as it first checks to see if the players shield count is above the cost threshold it then allows the item to be bought for the correct price. After this it updates shield count and deletes all the old shield info and shows the new shield.

This is also quite similar to the last shields code in the way it sets positions on timeouts and increases the shields times a multiplier and then updates the text.

Sorry this is a short lesson the next one will be longer and will include more info on updating our shop.

Thank you all for reading and make sure to check back for another post.

Shield Clicker Project Part 3

Today’s part of the project will mostly focus on the UI and some of the code for our shop screen. To start I will freshen up the interface and make it look nicer.

Before

After

I’ve also added code to each of the buttons that I will explain today to start we have our new shield the blue serpent.

With the blue serpent we needed to add multiple lines of code with the beginning of it here

We need this code to hide our blue serpent shield that sits atop our previous shield that way it doesn’t show up when we don’t want it to

This next whole segment of code is very simple. As soon as the new shield is purchased 1000 shields are removed from our total and our text changes. Both the shop elements are deleted and then our old shield is deleted. Finally the actual shield on the shield clicker screen is shown to be clicked.

Lastly for the serpent we need the actual on click/on event code.

This code is nearly identical to the old shields code expect for the position which it is at, the amount it bounces and the amount of shields it gives. It gives 2 shields and bounces slightly less. You might also notice that there is a multiplier variable which we will get to in a minute.

Our next shop item is the double click which allows us to get you guessed it double the points from clicking essentially giving us a 2 times multiplier.

To start we needed to declare our multiplier variable and setting it to 1 is ok because anything times 1 is itself and we cant set it to 0 as anything times 0 is 0. From here we can add some very simply multiplier code to make it work.

To start of course the multiplier has to be bought from the shop with the correct amount of shields. Next the text is reset to represent the new amount of shields, next the multiplier variables value is adjusted to 2, and then the shop elements are deleted.

Our final item in the shop is our first auto clicker/auto forger that makes shields. This code is definitely the most complex so far.

This on event just as the other allows us to purchase the auto clicker with the correct amount of shields and then updates the amount of shields text. After that our shop elements are deleted and then our auto clicker is shown. We add a new variable called visible that might be important later and finally set a timed loop with a custom function.

This is the function and it clicks for us every 1000 milliseconds and sets the text correctly to the new amount of shields.

That was quite a lot of coding for one blog post but I hope you enjoyed and feel free to check out my YouTube channel for interesting gaming/cooking videos. Link: https://www.youtube.com/channel/UCrlNUqQVBxLIbdltHQBdcYg