As you saw from the title there is a new vaccine being developed that is in clinical trials at Johns Hopkins University. The leader of this project is a man named Arturo Casadevall. He is a Bloomberg distinguished professor of Molecular Microbiology & Immunology and Infectious diseases at Johns Hopkins University.
Arturo Casadevall Age: 63
Arturo and his team of medical researchers at Johns Hopkins are creating a convalescent serum to treat COVID-19. these serum uses the healthy antibodies from patients who have been infected by corona virus and then have fought of the virus. These antibodies that come from the recovered patients blood are helping the sick patients antibodies defeat the corona virus.
As the serum went through mopre and more clinical trials it started to prove to be a safe and effective way to combat COVID-19 as such three days after the serums initial clinical trials the FDA allowed it’s use in emergency cases in NYC and Houston, Texas.
This first clinical trial was last Friday and because it was so successful the FDA allowed it in NYC and Houston and the FDA will allow Johns Hopkins to continue with their clinical studies over the next few months.
After Casadavall was given the green light by the FDA he began organizing 40 blood banks and hospitals in over 20 states that would take blood from patients who have overcome corona virus to create more of the serum so that they can administer it to patients who are in a critical state to help them overcome the virus.
The current estimate of when the serum will be publicly available as a vaccine will like be at the start of 2021, but until then the serum will be primarily used in patients who are in a critical state as they are the ones in need of immediate care and assistance that this serum will provide.
Although the serum won’t be a mass produced vaccine likely until 2021 the serum maybe distributed for compassionate use for people who have the virus in the early to middle stages to keep them off ventilators as hospitals do not have enough ventilators to ventilate thousands of people in one city. As the virus is extremely infectious.
But as of now we should still stay safe and at home during quarantine as the virus is still spreading rapidly and the number of global cases has exceeded 1.5 million and in the US the number is closer to 500,000 and the number of deaths is very close to 100,000.
Thank you all for sticking around until the end of my blog post and remember, stay safe, stay healthy, and STAY HOME.
The focus of today’s lesson is to show you how to add the Knights attack function, defense function, and defense break function. I will explain all of these functions/moves as I code them.
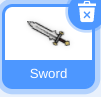
First up we have the attack function. This function is pretty simple but you have to get your sprite. I chose a sword that looked like it could have been used by a medieval knight.
Unfortunately as the sword moves I could not get a picture of it and its normal size but I was able to get a picture of its code file that showed what it looks like. Now that you have your sprite it is time to give it all of its code. This code is definitely more complicated then previous codes in this game but it shouldn’t be a problem.
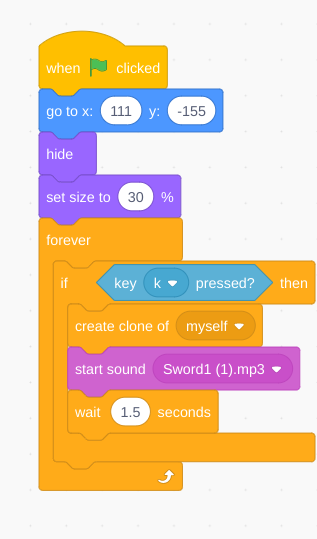
The first piece of code we have to add is the size and position of the sprite as well as how we duplicate it when we press a certain key on our keyboards.
size and duplication code for the sword
I personally chose the k key on my keyboard to duplicate the sword however you can choose whichever key you like. I also set the size and position of the sprite based on my needs you can adjust these however you would like. Now that we have this step done when you press the green flag your sword should be on top of the knight and invisible and when you press k it should shoot out an invisible clone which we will obviously have to make visible. Also keep in mind the sound is optional but I decided to add a sound that I thought sounded like someone unsheathing a sword.
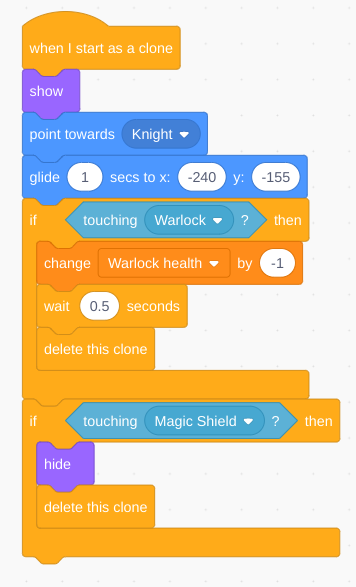
The next step is to add code to the clone because all we tell it right now aside from creating itself, is to start a sound, and wait 1.5 seconds. So to add a couple of commands specific to the clone we will need a special block that is called “when I start as a clone” and I will explain how it is used.
Once again this code may look complicated but it really is not too difficult. You probably see some new blocks such as the: point towards block , touching ? block, and the change variable block. But all these blocks will make sense as you get into the next couple of steps for this game. But now when our clone starts out it shows itself after which it glides to where the warlock is. If it hits him then it will change his health variable by -1 and it will wait 0.5 seconds then it will be deleted. But if the warlock uses his block function called the magic shield the blade will be neutralized instantly and it will not affect the Warlocks health.
Now that we have our attack function we can play the game. But it will be pretty basic as the Warlock will not even be able to attack. All he will be able to do is dodge. But we have one final step and this step is a sort of fail safe just in case our sword doesn’t delete itself which would be a problem later in our game.
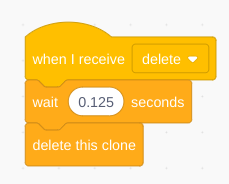
This code is extremely simple but it is a fail safe in case our “delete this clone code” does not work . In this case this block automatically sends the delete message which then allows these code blocks to activate and they immediately delete the sword.
That’s going to be it for this step of the 2 player battle simulator thank you all for reading my blog and I hope it has helped you so far.
This is the second step in building your very own 2 player battle simulator. Now that we finished the movement code for the knight we now have to do it for the Warlock .Once again I will be using strategies and techniques from one of my previous blogs so if you haven’t already check out my blog post called basic scratch terminology.
So now the first thing we have to do is get a sprite that we want to use and we insert it into the game.
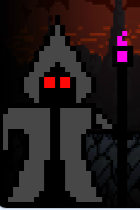
This is just personally I sprite I drew and I thought it looked nice and so I stuck with it. And unlike the knight he will have some other costumes. But now to start I will show you the first step to having the warlock move right.
Now this is one of the simpler commands as to get the Warlock back to its starting position you simply move him to the left and with the next command.
and the purpose of this command is obvious and that is to move leftand these commands are useful to position your character which could help you avoid attacks and it could help you dish out attacks.
The final movement command for the Warlock is the jump command which is slightly more difficult to program but not much more difficult.
The added change y by -50 at the end of the command simply makes it so that your Warlock falls back to the floor as opposed to floating in air and of course you can edit the height that the warlock jumps by changing the y values. I hope everyone liked this tutorial and feel free to email me and to comment down below if you have any questions. My email is in the about me section of my blog.
Now I know it’s a little off the topic of coding but just putting into consideration the things that are going on in the world with COVID-19. I figured it would be useful to give tips and advice for how to keep yourself safe and healthy during these difficult times. And I wanted to share new technologies out there that will help keep you in doing so.
EPAM GENTL Face Mask
One large problem people are beginning to face is that there are not enough face masks at stores to go to. Luckily EPAM has come up with an innovative solution, The GENTL mask. This product is the first of these many new technologies people are creating all over the world. And this mask is a great example of a brand new technology as it’s press release was only 1 week ago. These GENTL masks are quite interesting in their structure as they cover the entire nose and mouth whereas traditional masks don’t. And as such they do not let any bacteria enter your nose and mouth through gaps that traditional masks don’t cover.
The areas where there are red circles represent areas where bacteria can easily get through your face mask especially when you come into contact with other people. Because when you interact with others you can possibly get microscopic bacteria on your face from talking to them or interacting with them at all and these bacteria will make you sick and more susceptible to COVID-19 and these bacteria could even be COVID-19!
But instead of using these cheap masks that are mass produced just for companies to make money you could buy the GENTL mask that does not allow for any bacteria to get through. This is because it completely seals off your nose and mouth from bacteria. Also it is easy to communicate through these GENTL masks because they are breathable and they have a special screen that prevents bacteria from going or out. Where as regular masks can be annoying and uncomfortable and they have a very thin and flimsy plastic wall to keep bacteria out that is just completely ineffective.
These are the links to both the EPAM website for the GENTL mask and the youtube video for the GENTL mask
The next innovative product was developed by scientists and doctors at MIT who were hoping to greatly reduce the cost of otherwise overpriced ventilators. The reason Ventilators are needed is because Coronavirus is a respiratory disease that can compromise the lungs which will lead to suffocation and eventually to death. Which is why we have ventilators that help a patient breath using an automatically refilling airbag to give the patient oxygen. There are 2 main problems with modern ventilators, 1. They are way too expensive, the average ventilator costs around 30,000$ which is the same price as a small car. 2. They take a very long time to manufacture and on average it takes about 1-2 weeks to make a ventilator.
Thankfully the MIT Emergency Ventilator solves both of these problems. The average cost to make 1 ventilator is 500$ and the average manufacturing time is only 1-2 days and as such they are much easier to produce. This new technology is amazing and it was press released today via youtube and the website’s final prototype design was created 3 days ago on March 31, 2020.
MIT Ventilator
This is a modern day ventilator similar to the ones used in hospitals
This ventilator to the right is the one scientists and doctors created at MIT.
As you can see the MIT Emergency Ventilator is much smaller than the traditional ventilator and it is much less complicated to use. You simply attach an air pipe to the air bag connector that is circled, and once you do that you simply put the breathing mask over the patients nose and mouth and you start the machine. The machine will automatically start using its arms to compress the airbag that pushes air in through the tube and into the patients nose and mouth. The airbag has a special hole that brings in air from all the space around it and then this process repeats itself.
Unfortunately this last “Technology” has not been fully tested yet so scientists are still experimenting with it as it used to be a antiviral medicine against ebola but it was never used so scientists are modifying it to fight against Corona Virus and it is currently in clinical trials in companies such as Gilead Sciences, Norvavuax, Moderna, Sanofi, GlaxoSmithKline, and Johnson and Johnson. These 6 companies are leading the frontier of developing a vaccine or antiviral drug to fight against corona virus and they are either developing Remdesvir or other drugs similar to it. These will hopefully be completed around June or July and with these drugs they hope to decrease the death rate of Corona Virus which will also hopefully settle the mass hysteria that everyone is having. This will result in a boost in economy, travel, and business.
Tips to lower the risk of getting COVID-19
Now I can’t Guarentee that these tips will prevent you from getting corona virsu but these are just some things to practice even if you are not in quarantine.
Social Distancing: This is arguably the most important thing that you can do because the less people you interact with the harder it is for the virus to spread and if you do have to interact with people than do it from a distance and make sure to wear proper protective gear when you leave your house.
Wear proper protective gear: If you don’t leave the house wearing good protective gear than you run the risk of getting corona virus and that is not a risk I would recommend taking. But here are my recommendations of what gear you should wear; face mask, gloves, and clothes you don’t mind immediately throwing in the washing machine because they will be super dirty.
Try to only have 1 person go to grocery stores or anywhere outside of the house: this is because you only want a limited amount of people exposed to the outside. And also the people you are sending should not be older than 60 or younger than 18. Because anyone younger than 18 or older than 60 has a higher risk of infection and death.
That was all my tips to fight against corona virus thanks to all of you who made it this far I hope you enjoyed this blog and I will make sure to write more blogs not just about coding but also about whats going on in the world.
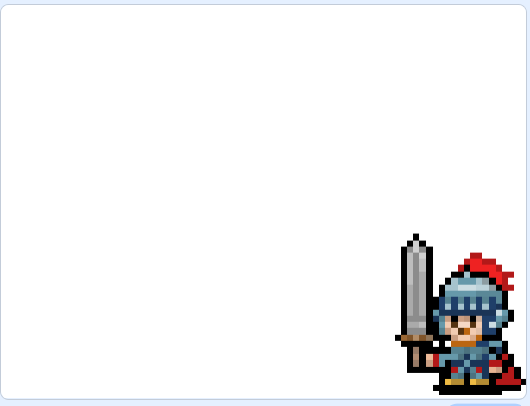
We are finally at the point now where we can start making our first game using the skills and techniques I have explained in previous blogs. To start off we will add a knight I found off the internet. It is okay if your knight does not look the same or have a different size we can adjust that later.
As you can see my knight is in the corner of my screen and is relatively small.
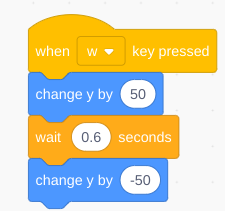
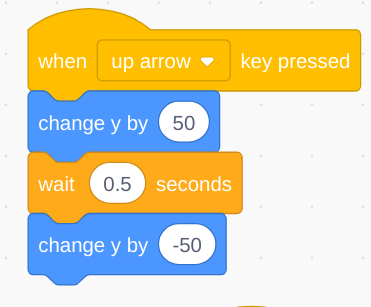
Next we have to add the movements that our knight does we need to add a (when up arrow key pressed). To the (when up arrow key pressed) we need to add a (change y by 50) block, a (wait 0.5 seconds) block, and a (change y by -50) block.
This is our first piece of code.
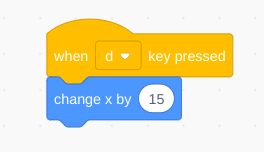
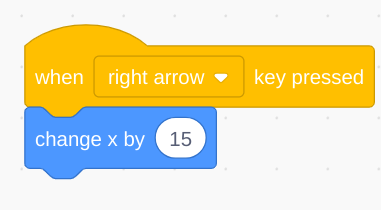
Next we need a (when right arrow key pressed) block with a (change x by 15) block connected to it.
This is our second piece of code and notice the fact that these to blocks are not connected make sure they do not connect because they can get messed up.
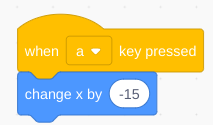
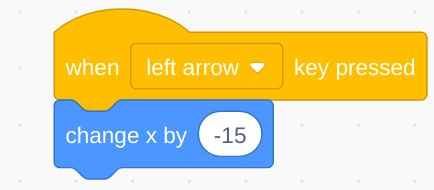
Finally we need a (when left arrow key pressed) block with a (change x by -15) block connected to it.
This is our third and one our last basic movement script.
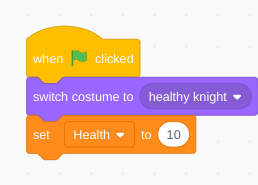
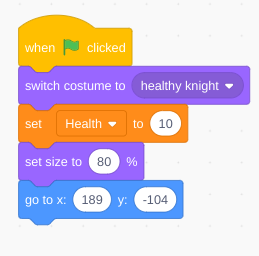
Next I will take a when (green flag clicked) block and a (switch to costume 1) and connect them. After this I will add a variable To make a variable you go to the tab labeled variables and click make a variable. Make sure that when you make the variable it is labeled health and that it is for this sprite only. Once you have finished your variable take a (set health to) block and connect it to the other 2 blocks. Make sure to set the health input to 10.
Don’t forget to set the health input to ten.
The next 2 blocks may differ slightly on the type and size of the knight you pick for your game. For my sprite I need to use a (set size to 80%) this may be a greater number or a smaller number depending how big your knight is. Finally you add a (go to) block and my coordinates are x:189 and y:-104 your coordinates might differ slightly once you connect all your blocks it should look like this.
Finished product.
This is the end for the first part of making my game 2 player battle simulator thanks for reading my blog and don’t forget to leave a comment and whether you like it or not.